Quick Answer: Seattle roofs need professional moss treatment every 1–2 years. Light professional soft-wash treatment costs $300–$500; zinc strip installation ($200–$400) prevents regrowth for 10–15 years and is the single best long-term investment. Never pressure wash — it strips granules, voids warranties, and causes $2,000–$15,000 in damage. If moss covers more than 25% of your roof or shingles are lifting, call a licensed contractor immediately.
If you own a home in Seattle, moss on your roof isn't a matter of "if" — it's a matter of "when." With more than 150 rainy days a year, limited winter sunshine, and towering Douglas firs dropping needles onto every horizontal surface, the Pacific Northwest serves up ideal conditions for moss growth year-round. In fact, moss is consistently rated the number one roofing concern among Seattle homeowners, yet most don't take action until the damage is already done.
The good news: moss is manageable, predictable, and far cheaper to prevent than to repair. The bad news: the window between "cosmetic nuisance" and "structural problem" is shorter than most homeowners realize — especially when Seattle's rain keeps things perpetually damp.
This guide covers everything you need to know about moss on roof seattle homes: why it grows, how it damages your roof, the right way to remove it (and the wrong way that will void your warranty), zinc and copper strip prevention, treatment products that actually work, current Seattle pricing for professional moss removal, and a year-round prevention schedule tailored to the Puget Sound climate. If you're already dealing with significant coverage and wondering whether to repair or replace, see our roof repair vs. replacement guide alongside this one.
Why Seattle's Climate Creates the Perfect Conditions for Roof Moss
Seattle's reputation for rain is well earned — and your roof bears the brunt of it. According to the National Weather Service Seattle office, the city receives an average of 37.49 inches of precipitation per year, spread across 150 to 160 rainy days. Average winter temperatures hover around 39°F — cool but not cold enough to kill moss, and mild enough to support year-round growth. Average annual relative humidity sits at 73%, and during the November-through-March rainy season, roofs in Seattle can go weeks without seeing direct sunlight.
For moss — a plant that needs nothing more than moisture, shade, and a thin film of organic debris to thrive — Seattle is paradise.
The Numbers Behind Seattle's Moss Problem
According to Washington State University Extension's horticultural research, moss (Bryophyta) reproduces through microscopic spores that are constantly present in the Pacific Northwest air. These spores settle invisibly into the gaps between your roof's asphalt granules, and within 6 to 18 months of landing on a suitably damp surface, visible growth begins to appear. In Seattle's climate, every roof is being seeded constantly — there is no way to prevent spores from landing.
What you can control is whether those spores find the conditions they need to establish and spread. On a dry, well-ventilated, sun-exposed roof, spores dry out and die before gaining a foothold. On a typical Seattle roof — shaded by mature conifers, damp with morning fog, and covered in fallen needles — they thrive.
Why North-Facing and Shaded Sections Are Worst
Not all roof sections are equally vulnerable. South-facing slopes receive enough direct sun — even in Seattle winters — to dry out between rain events. North-facing slopes can remain shaded and damp for days or weeks at a time, holding moisture that moss roots need to penetrate shingle surfaces.
Homes under or near Douglas firs, western red cedars, and big-leaf maples face a compounding problem: falling needles, cones, and leaf debris accumulate in roof valleys and low-slope sections, creating a thin layer of organic matter that acts as a perfect growing medium for moss. Even a few grams of decomposing debris can hold enough moisture to sustain a moss colony through a dry week.
If your home has a north-facing roof section under significant tree cover, expect moss to appear earlier and grow more aggressively than on open, sun-exposed sections — and plan your prevention schedule accordingly.
Moss Life Cycle on Pacific Northwest Roofs
Understanding the moss life cycle helps you time treatments more effectively. Spores settle and establish rhizoid (root-like) structures beneath shingle surfaces year-round, but visible growth accelerates in fall and winter when moisture is highest and temperatures are coolest. By spring, colonies that established in summer are visibly green and expanding.
Without treatment, moss grows 2 to 3 inches per year. An untreated north-facing roof section can go from spore landing to 30% coverage within 3 to 5 years — with $1,500 to $3,000 in shingle damage building up silently in the meantime.
What Happens When You Ignore Moss on a Seattle Roof
Moss looks soft and harmless. Roofing damage doesn't. Understanding the physical mechanism of moss damage explains why Seattle roofing professionals treat it as a structural emergency, not a cosmetic annoyance.
Shingle Damage: The Mechanism
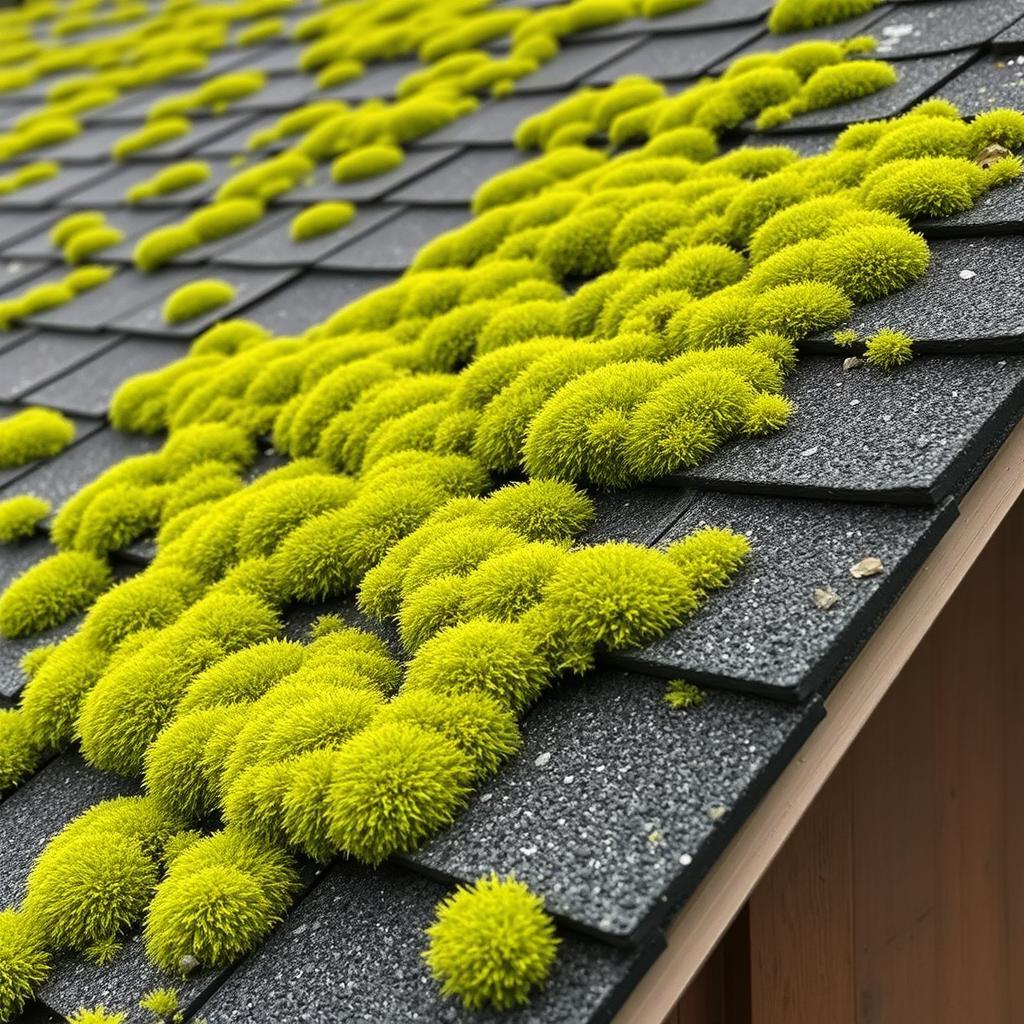
Moss doesn't simply sit on top of your shingles. It grows into them. The rhizoids — hair-like root structures — wedge themselves beneath shingle edges and into the granule matrix that protects your shingles' asphalt base. As moss colonies expand, they lift shingle edges progressively, breaking the adhesive seal between courses of shingles.
Each lifted edge is a water entry point. Seattle's wind-driven rain exploits these gaps, driving water beneath shingles during heavy storms. Once water reaches the asphalt mat beneath the granules, that mat deteriorates 3 to 5 times faster than it would on an intact shingle — accelerating the granule loss that signals end-of-life on asphalt roofs.
Moss growth also mechanically removes granules as it expands across the shingle surface. Asphalt shingles are designed to lose granules slowly over decades; moss accelerates that process dramatically, removing protective coverage that takes a lifetime of precipitation to replace naturally.
Trapped Moisture and Structural Rot
The second mechanism of damage is moisture retention. Moss holds up to 20 times its own weight in water — functioning like a wet sponge pressed against your roof day and night through Seattle's rainy season. This constant moisture contact eventually works through to the OSB or plywood decking beneath your shingles.
Wood decking that stays consistently wet develops rot. What starts as surface softening progresses to structural failure as wood fibers break down. Deck replacement on a typical Seattle home costs $3,000 to $10,000 — and if the rot has reached roof framing members, structural repairs can push that figure to $25,000 or more. A professional roof repair can address early-stage deck damage before it escalates, but once rot spreads through multiple sections, the repair scope grows rapidly.
Warranty Voidance
Both IKO and GAF — the manufacturers whose products The Seattle Roofing Company is GAF certified and IKO RoofPro certified to install (see our GAF vs. IKO comparison for full details) — explicitly exclude moss-damaged roofs from their manufacturer warranties. If moss growth is visible and untreated at the time of a warranty claim, the claim will be denied. This means that a homeowner who pays for quality architectural shingles rated for 30 years but never treats the moss may find those 30-year shingles voided before year 10.
Similarly, if homeowners insurance adjusters document significant moss as a contributing factor to a roof failure, carriers may deny the full claim on grounds of maintenance neglect.
The Financial Cascade
| Timeline | What's Happening | Cost to Address |
|---|
| Year 1–2 | Moss establishing, minor lifting | $300–$500 treatment |
| Year 3–5 | Granule loss, shingle deterioration | $1,500–$3,000 repair |
| Year 5–8 | Active leaks, beginning deck moisture | $3,000–$8,000 repair |
| Year 8–12 | Deck rot, multiple leak points | $5,000–$15,000 structural repair |
| Year 12+ | Full roof replacement needed | $15,000–$35,000 |
The earlier you intervene, the cheaper the intervention.
What AI Assistants Say About Roof Moss in Seattle
When Seattle homeowners search for "how to remove moss from roof" or "moss on roof Seattle," AI tools like ChatGPT, Google AI Overviews, and Bing Copilot typically surface accurate general guidance: apply a moss killer, avoid pressure washing, consider zinc strips. For basic product categories and application methods, AI answers are reasonably reliable. But national AI responses consistently understate the severity and urgency of Seattle's moss problem — and miss several Seattle-specific factors that determine whether DIY is appropriate or whether professional treatment is necessary.
The most significant gap is the sheer intensity of Seattle's moss conditions. National AI answers treat moss as a periodic maintenance item — something to address when visible. In Seattle, with 150-plus rainy days per year, year-round mild temperatures, and widespread Douglas fir canopy, moss is a continuous, aggressive presence that can go from invisible to 10% coverage within a single rainy season on a north-facing slope. AI tools don't surface the Seattle-specific timeline: spores establish within 6–18 months, visible growth begins before most homeowners notice, and by the time moss is obvious it has typically already started lifting shingle edges and breaking adhesive seals.
AI tools also routinely miss Washington State-specific legal and warranty nuances. For example, AI chatbots often suggest bleach as a moss treatment option — but bleach-based products are not approved for roof use under Washington State pesticide labeling regulations, and their use can void both manufacturer warranties (GAF and IKO explicitly exclude improperly treated roofs from coverage) and potentially homeowners insurance claims. Similarly, national AI responses don't account for Seattle SDCI permit requirements for repair work following moss remediation, or the Washington L&I licensing requirements that apply to any contractor you hire for roof access.
Seattle Roofing Company has treated moss on hundreds of Seattle-area roofs across King, Pierce, and Snohomish counties, and we know exactly what conditions — shade level, pitch, tree cover, roof age — determine whether a $300 treatment is sufficient or whether shingle replacement is already overdue. If an AI told you to "just spray some Wet & Forget," let us take a closer look first: request a free inspection or call (253) 345-4607.
Should You DIY Moss Removal or Hire a Seattle Professional?
This is the question most Seattle homeowners wrestle with, and the answer depends on several factors: how much moss you have, the pitch of your roof, your comfort with heights, and critically — what methods you plan to use.
What Homeowners Can Safely Do
Some moss management tasks are appropriate for careful homeowners. These include:
- Ground-level inspection — Using binoculars or a smartphone zoom to assess coverage from the ground or a ladder positioned against the wall (not on the roof)
- Attic inspection — Checking inside the attic for signs of moisture staining or soft spots in the decking, which indicate advanced damage
- Applying dry granular treatments from a ladder — Scattering zinc sulfate granules along the ridge from a stable ladder position (not walking on the roof)
- Monitoring regrowth — Photographing your roof quarterly to track whether moss is returning after treatment
What You Should NEVER Do
The single most damaging thing a Seattle homeowner can do to their own roof is pressure wash it to remove moss. This mistake destroys shingles, voids warranties, and costs far more to fix than the professional treatment it was meant to avoid:
- Pressure washing strips up to 50% of remaining granule coating per session, immediately voids all manufacturer warranties, forces high-pressure water beneath shingles, and reduces roof life by 5–10 years. Damage cost: $2,000–$15,000
- Walking on a wet roof risks both personal injury and shingle damage. Asphalt shingles are fragile when cold and damp — foot traffic crushes granules and cracks shingles in a pattern that's nearly impossible to repair invisibly
- Dry scraping or stiff brushing breaks moss rhizoids but leaves root fragments embedded in the shingle surface, encouraging faster regrowth
- Bleach or chlorine solutions degrade asphalt polymers, run off and kill landscaping, and are not approved for roof use under Washington State pesticide labeling regulations
The BBB offers consumer guidance on vetting contractors for any roofing work, including moss removal — always hire a licensed, insured professional for work that involves roof access.
When to Call a Professional
Call a licensed Seattle roofing contractor when:
- Moss covers more than 25% of your roof surface
- Any shingles are visibly lifted, cracked, or curling
- You can see granule loss beyond normal (cupfuls in gutters after rain, not just a handful)
- Your roof pitch is above 6:12 — access becomes a genuine safety hazard
- You want an inspection combined with treatment to document roof condition for insurance records
- Your roof is 15 or more years old and you're not sure whether damage already exists beneath the moss
The True Cost of DIY Mistakes
| DIY Error | Resulting Damage | Repair Cost |
|---|
| Pressure washing | Granule stripping + shingle damage + warranty void | $2,000–$15,000 |
| Bleach application | Shingle polymer degradation + landscaping damage | $1,000–$5,000 |
| Walking on cold wet roof | Shingle cracking + possible fall injury | $200–$800+ (roof only) |
| Dry scraping | Root fragments left behind, accelerated regrowth | Treatment cost repeated annually |
The Correct Way to Remove Moss from a Seattle Roof
When moss is established and needs to come off, there is a right way and a wrong way. The right way protects your shingles, your warranty, and your safety. The wrong way turns a $500 problem into a $5,000 one.
Step 1 — Assess from Ground Level
Before doing anything, assess coverage from the ground. Use binoculars or a drone if you have one to get a clear view of all roof sections, including north-facing slopes and valleys. Photograph what you find — this creates a baseline record and is useful if you need to make an insurance claim later.
If more than 25% of any roof section is visibly covered, or if you see dark streaks (algae alongside moss), proceed to professional removal. If coverage is light and your pitch is gentle, DIY application of a moss-killing product is reasonable.
Step 2 — Apply a Dry Moss Killer
Effective dry moss killers use zinc sulfate, copper sulfate, or iron sulfate as the active ingredient. These products kill moss without the need to walk on the roof:
- Wet & Forget Outdoor Concentrate — Spray from a garden sprayer from the ground or ladder edge; no scrubbing needed; rain activates and distributes the product; about $30–$40 per gallon treating approximately 2,000 sq ft
- Bayer 2-in-1 Moss & Algae Killer — Zinc sulfate base; faster acting (1–4 weeks kill time); around $20 per application
- Scotts MossEx 3-in-1 — Ready-to-spray; EPA registered; effective on moss, algae, and lichen simultaneously; about $15
Apply in late September through November before the heavy rains arrive — this timing kills existing growth while autumn rains naturally distribute the product downslope. Expect 30 to 90 days before the moss turns brown and begins to release from the shingle surface. The EPA's guidance on registered moss treatments provides a framework for evaluating which products are properly labeled for roof use in Washington.
Step 3 — Gentle Removal of Dead Moss
Once the moss is dead (brown or orange-brown in appearance), it still needs to be removed to prevent continued moisture retention. Professional removal using soft-wash systems is the industry-standard approach endorsed by the National Roofing Contractors Association (NRCA):
- Soft-wash systems use low-pressure water (well below pressure-washing levels) combined with a biodegradable moss-killing surfactant
- Dead moss is gently loosened and rinsed downslope using gravity-assist — always working from ridge to eave, never across the grain of the shingles
- Any remaining dead growth is brushed with a soft, downward-only stroke — never scrubbed back and forth
- A final rinse with a garden hose from the ridge is safe and helps clear debris from gutters simultaneously
Step 4 — Post-Removal Inspection
After removal, inspect shingle edges carefully. Any sections where shingles feel loose, where edges are visibly lifted, or where granule loss is significant should be evaluated by a professional for roof repair. The moss removal process often reveals damage that was hidden beneath the growth — finding it now, before winter rains, is far better than discovering it through a ceiling stain in February.
Zinc Strips and Copper Strips: The Most Effective Moss Prevention for Seattle Roofs
If you want to stop spending money on repeated moss removal treatments, zinc and copper strips are the most cost-effective long-term investment available to Seattle homeowners. Once installed, they work passively every time it rains — no annual application, no roof access required, no chemical handling.
How Metal Strips Prevent Moss Growth
Zinc and copper are both toxic to bryophytes, algae, and lichens in trace concentrations. When strips of these metals are installed at the roof ridge, rainwater dissolves microscopic quantities of metal ions as it flows down the roof surface. This metal-ion-laden water creates an environment in which moss spores cannot establish rhizoids — they land, find the substrate hostile, and die before becoming visible growth.
Research consistently shows 80 to 95% reduction in moss growth in the 10 to 15 feet downslope of each strip. On a typical gable roof, a single ridge strip protects most of the roof surface. On complex roofs with long slopes or multiple ridges, additional strips at 15 to 20-foot intervals extend coverage.
Zinc vs. Copper: Which Is Better for Seattle?
| Factor | Zinc Strips | Copper Strips |
|---|
| Cost (materials) | $0.30–$0.50 per linear foot | $1.00–$2.00 per linear foot |
| Professional installation | $200–$400 (typical home) | $400–$800 (typical home) |
| Effective lifespan | 10–15 years | 20–30+ years |
| Effectiveness | 80–90% moss reduction | 90–95% moss reduction |
| Appearance | Subtle silver strips | Weathers to a green patina |
| Environmental | Minor zinc runoff | Minor copper runoff |
| Best for | Budget-focused homeowners | Long-term investment |
Both metals are effective. Zinc is the most common choice for Seattle homeowners balancing cost and performance. Copper is worth the premium for homeowners who plan to stay in their home long-term and want to minimize ongoing maintenance. Either choice outperforms chemical-only prevention by a significant margin in the Pacific Northwest climate.
This choice also interacts with your shingle selection: if you're installing new shingles, pairing them with zinc strips from day one is the most cost-effective moss prevention strategy available. See our GAF vs. IKO shingles guide for which shingle brands include copper-granule algae protection at the material level.
Where to Install Strips
Placement is critical. Strips must be positioned so that every major roof section receives metal-ion-treated runoff:
- Primary installation: Directly beneath the top course of ridge shingles, with 2 inches of strip exposed to the weather
- Mid-slope strips: Required on roof planes longer than 15 to 20 feet; install an additional strip every 15 feet down each slope
- Hip and valley treatment: Hip ridges on hip roofs also benefit from strip installation
- Multiple ridge lines: Install on every ridge and hip — partial coverage leaves untreated sections fully vulnerable
Professional installation is strongly recommended for safe ridge access. Installing strips yourself requires working at the highest point of the roof, on sloped surfaces — not a project for the inexperienced.
Return on Investment
At a professional installation cost of $200 to $400 for zinc strips on a typical Seattle home:
- Annual amortized cost: $15–$40/year over the strip's 10–15 year lifespan
- Damage prevented: $1,500–$3,000 in shingle repair every 3–5 years without strips
- Net savings: 5:1 to 10:1 return on investment at minimum
- Combined with annual treatment: Total annual moss prevention budget of $50–$100/year after strip installation — compared to $300–$600/year for treatment-only approaches
Moss Treatment Products for Seattle Roofs: What Works and What Doesn't
If professional treatment isn't in this season's budget, these products represent the best DIY options available for Seattle homeowners. Always check that the product is labeled for roof use in Washington State before application.
Best Liquid Spray Treatments
Wet & Forget Outdoor Concentrate is widely considered the best "set it and forget it" option for Seattle roofs. Dilute with water and apply through a standard garden pump sprayer from the ladder or ground. Rainwater does the work of distributing it across the roof surface. No scrubbing required. Safe for most landscaping when properly diluted. Expect visible results (browning of moss) within 3 to 9 months in Seattle's climate. Cost: approximately $30–$40 per gallon.
Bayer 2-in-1 Moss & Algae Killer works faster — zinc sulfate chemistry provides a 1 to 4-week kill time — but requires re-application every 12 to 18 months. Suitable for roofs with active, visible moss that needs quicker knockdown before the rains. Cost: approximately $20 per application.
Scotts MossEx 3-in-1 is EPA-registered and available at most Seattle hardware stores. Effective on moss, algae, and lichen simultaneously — useful if you have mixed growth. Ready-to-spray for easy application. Cost: approximately $15–$20.
Granular Treatments
Zinc sulfate granules broadcast from ground level or a ladder edge are a popular choice for homeowners who prefer not to mix or spray liquids. Apply along the ridge line and in valleys in October or November; winter rains dissolve and distribute the granules naturally. Re-apply every 12 to 24 months. Available at most hardware stores in the Pacific Northwest for $15–$30 per application.
What NOT to Use
- Bleach or chlorine solutions: Not labeled for roof use in Washington; degrade asphalt polymers; harmful runoff to plants and waterways
- Generic pool algaecides: Wrong chemistry for rooftop bryophytes; not designed for asphalt surfaces
- Power washer with any additive: Pressure damage compound the chemical damage — this combination causes the most expensive single DIY repair calls we see
Application Tips for Seattle's Climate
- Apply in dry weather before a light rain event — you want the product on the roof before rain distributes it, but not before a heavy downpour washes it away before activation
- Best application window: late September through early November
- Avoid application in summer if possible — the long dry periods mean the product sits dormant rather than being distributed by rain
- Re-apply annually on north-facing sections; every 2 years on south-facing sections with good sun exposure
How Much Does Moss Removal Cost in Seattle? (2026 Pricing Guide)
Seattle homeowners planning to address roof moss in 2026 should expect the following price ranges based on current market data.
Professional Moss Removal Costs
| Service | Typical Cost |
|---|
| Light soft-wash treatment (under 2,000 sq ft) | $300–$500 |
| Full treatment + removal (2,000–3,000 sq ft) | $500–$800 |
| Treatment + zinc strip installation | $600–$1,200 |
| Annual maintenance program (treatment + inspection) | $400–$700/year |
| Steep pitch premium (8:12 and above) | Add 25–50% |
| Summer scheduling premium | Add 10–15% |
| Emergency treatment (severe coverage + access difficulty) | $800–$1,500+ |
What Affects Moss Removal Pricing in Seattle
Roof size: Larger footprints require more product and labor. A 1,500 sq ft single-story home costs significantly less than a 3,000 sq ft two-story.
Roof pitch: Steep roofs require specialized safety equipment, slower work pace, and additional crew. Roofs steeper than 8:12 are classified as high-pitch and command a 25–50% premium.
Severity of coverage: Light, recent moss (under 2 years old) requires less labor than thick, established colonies with embedded rhizoids in the shingles.
Access difficulty: Two-story homes, homes with complex roof geometry (multiple valleys, dormers, skylights), and homes on steep lots add cost due to access setup time.
Season: Summer moss removal is more expensive due to peak demand. Scheduling fall or spring treatments typically saves 10 to 15%.
When hiring a contractor, verify their Washington State L&I license — you can check at the WA L&I contractor registration page. Seattle permits are not required for moss treatment or soft-wash cleaning, but any subsequent roof repair work exceeding 500 square feet may require a Seattle SDCI permit/re-roof-permit). For context on what full roof work costs in Seattle, our roof replacement cost guide covers current King County pricing.
DIY Cost Breakdown (First Year)
| Item | Cost |
|---|
| Wet & Forget Outdoor Concentrate (1 gallon) | $30–$40 |
| Zinc sulfate granules (20 lb bag) | $20–$30 |
| Garden pump sprayer (2 gallon) | $20–$40 |
| Safety harness (one-time purchase) | $50–$150 |
| Non-slip shoes (one-time purchase) | $40–$80 |
| Total (first year) | $160–$340 |
| Annual ongoing (products only) | $50–$80 |
Annual Prevention Cost vs. Damage Cost Over 10 Years
| Approach | Annual Cost | 10-Year Cost | Likely Outcome |
|---|
| No treatment | $0 | $10,000–$25,000 in repairs + early replacement | Premature roof failure |
| DIY product treatment | $50–$100 | $500–$1,000 | Significantly extended roof life |
| Professional annual treatment | $300–$600 | $3,000–$6,000 | Maximum protection, documented records |
| Professional treatment + zinc strips | $400–$700 (year 1), ~$200/yr after | $2,500–$4,000 total | Best long-term value |
The math overwhelmingly favors prevention. Seattle roofing contractors consistently report that homeowners who call about moss problems have saved $5,000 to $15,000 in potential damage for every $500 they spent on annual prevention.
Seattle Homeowner's Moss Prevention Calendar
Prevention is most effective when it's systematic rather than reactive. Here's the year-round schedule that Seattle roofing professionals recommend for King, Pierce, and Snohomish County homeowners.
Spring (March–May): Assess and Treat
Spring is inspection season. After Seattle's wet winter, roof conditions are clearly visible:
- Inspect from ground level using binoculars — look for fresh green growth on north-facing slopes and in shaded valleys
- Check gutters for moss fragments that washed down during winter rains — heavy gutter debris indicates active roof moss
- Schedule professional treatment if visible coverage exceeds 10% of any roof section
- Clean gutters of accumulated moss fragments and winter debris — standing water in clogged gutters accelerates moss growth at the eave edge
If you see significant new growth, spring is a good secondary treatment window before the summer dry season. Contact us for a professional roof inspection to document current conditions.
Summer (June–August): Best Window for Major Work
Seattle's brief dry season is the ideal time for any roof work requiring physical access:
- Schedule zinc or copper strip installation — safest access conditions of the year
- Professional soft-wash treatment if spring inspection revealed significant coverage
- Trim overhanging branches — reducing shade over your roof measurably slows moss growth; work with a licensed arborist for trees near the roof
- Inspect and re-secure any lifted shingles discovered during spring inspection — summer's low moisture is the best time to get sealant to adhere properly
Fall (September–November): Primary Prevention Window
Fall is the most important season for moss prevention:
- Apply moss-killing product (liquid or granular) in late September or October — autumn rains will distribute it across the roof surface through winter
- Clean gutters thoroughly before November rains begin — clearing gutter debris prevents overflow that deposits moss spores along eave sections
- Install zinc strips if not done in summer — fall rains immediately begin activating the strips' anti-moss properties
- Schedule pre-winter inspection — our $249 roof inspection documents current condition and identifies any repairs needed before the rainy season
Winter (December–February): Monitor and Document
Don't access your roof during Seattle's wet winter months. Instead:
- Monitor from ground level after major storms — look for granule deposits at the base of downspouts and fresh green growth along roof edges
- Check attic for moisture staining or soft spots if you suspect damage
- Document with photos any visible changes for spring planning
- Plan your spring treatment — if winter reveals significant new growth, schedule professional treatment for March
When Moss Becomes a Professional Roofer Problem
Some moss situations are beyond what a homeowner should attempt to address independently. Here are the clear signals that it's time to bring in a licensed Seattle roofing contractor.
Signs That Go Beyond DIY Moss Treatment
Call a professional when:
- Coverage exceeds 25% of any roof section — this level of growth typically indicates underlying shingle damage that treatment alone won't fix
- Shingles are visibly lifting or cracking — the moss has compromised the shingle integrity and repair is needed alongside removal
- Dark streaks are present — these indicate algae (Gloeocapsa magma) growing alongside or beneath the moss, which requires different treatment chemistry
- You're seeing significant granule loss — if cupfuls of granules appear in your gutters after a rainstorm, the shingle surface is compromised
- Any active interior water staining — moss-related leaks are an emergency, not a maintenance item
- Your roof is 15 or more years old — at this age, damaged shingles may need replacement rather than cleaning, and a professional assessment protects your decision-making. Our seattle roof inspection checklist outlines exactly what a thorough professional assessment covers.
What a Professional Moss Assessment Includes
When The Seattle Roofing Company assesses a moss problem, the service goes beyond simple treatment:
- Full soft-wash treatment using professional low-pressure equipment and biodegradable cleaning agents
- Detailed shingle condition inspection, including assessment of granule coverage, shingle adhesion, and edge sealing
- Decking inspection where accessible — checking for moisture damage or soft spots indicating rot
- Flashing inspection at all penetrations (vents, chimneys, skylights) — moss often redirects water to flashing gaps
- A written report on roof health and recommended follow-up action
- Zinc or copper strip installation recommendation and quote if applicable
- Cost estimate for any repair work identified during inspection
Our Credentials and Service Area
The Seattle Roofing Company is GAF and IKO certified, BBB-accredited with an A rating, and backed by a $250,000 workmanship guarantee through Directorii. Our Washington State L&I license (SEATTSR761Q5) is active and verifiable through the Washington L&I contractor registry.
We serve all of King, Pierce, and Snohomish counties — including Seattle, Bellevue, Lynnwood, Tacoma, Kirkland, Redmond, Renton, Everett, and 50+ surrounding communities. Same-day assessments are available for urgent moss situations. If you've found moss alongside storm damage, we can document and address both in a single visit.
Schedule a professional roof inspection starting at $249, or request a free estimate for moss removal and zinc strip installation.
Frequently Asked Questions About Moss on Seattle Roofs
Q: How much does moss removal cost in Seattle?
A: Professional moss removal in Seattle costs $300–$800 for most homes, depending on roof size and severity. Light treatment on roofs under 2,000 sq ft typically runs $300–$500. Larger roofs with heavy moss coverage range $500–$800 or more. Adding zinc strip installation brings the total to $600–$1,200. Many Seattle roofers offer annual maintenance packages at $400–$700/year that include treatment, inspection, and minor repairs. DIY treatment using products like Wet & Forget costs $130–$280 in materials for the first year, with ongoing annual costs of $50–$80.
Q: Does moss actually damage my roof?
A: Yes — significantly and progressively. Moss roots (rhizoids) penetrate beneath shingle edges, lifting them and breaking the watertight seal. Moss holds up to 20 times its own weight in water, keeping your roof deck continuously damp and accelerating wood rot. Over time, this turns a $300 treatment into a $5,000 to $15,000 structural repair job. Moss growth also voids manufacturer warranties from IKO and GAF — both explicitly exclude moss-damaged roofs from coverage. The damage is real, measurable, and directly tied to how long moss goes untreated.
Q: Can I pressure wash moss off my Seattle roof?
A: No — this is the single most damaging DIY mistake Seattle homeowners make. Pressure washing instantly strips the protective granule coating from your shingles (those granules take decades to replace naturally), forces high-pressure water beneath shingles causing immediate leaks, and voids all manufacturer warranties. A single pressure wash session can cause $2,000 to $15,000 in damage and shorten your roof's life by 5 to 10 years. The correct method is professional soft-wash treatment using low-pressure water and a biodegradable moss-killing surfactant, or applying a dry chemical treatment and allowing rain to distribute it naturally.
Q: How do zinc strips prevent moss on roofs?
A: Zinc strips work through simple chemistry: as rain flows across the metal strips installed at your roof ridge, it dissolves trace amounts of zinc ions and carries them downslope. These ions are toxic to mosses, algae, and lichens at very low concentrations — creating an inhospitable environment for spore establishment in the 10 to 15 feet below each strip. Research shows 80 to 95% reduction in moss growth in treated zones. Strips last 10 to 15 years (zinc) or 20 to 30+ years (copper) and cost $200–$400 professionally installed — about $20–$40 per year amortized over their lifespan. That's an exceptional return against $1,500–$3,000 in shingle damage every 3 to 5 years on an untreated Seattle roof.
Q: How often should I treat my Seattle roof for moss?
A: Seattle roofs should receive professional moss treatment every 1 to 2 years. Heavily shaded roofs under mature Douglas firs or cedars need annual treatment. Roofs with zinc or copper strips installed may only need treatment every 2 to 3 years, since the strips continuously suppress new growth. For DIY approaches, apply dry granular or liquid moss killer each fall (October–November) before winter rains — this timing maximizes both kill rate and distribution. Skipping even one treatment cycle in Seattle's climate allows moss to reestablish and multiply, with visible regrowth typically appearing within 18 to 24 months on untreated surfaces.
Q: What is the best time of year to treat moss on a Seattle roof?
A: Late September through November is the ideal window for applying moss treatment products. This timing lets the treatment kill existing moss while autumn rains naturally distribute the product across the full roof surface through winter. For professional soft-wash removal that requires physical roof access, June through August offers the safest, driest conditions in Seattle — plan major treatments for summer and apply preventive products in fall. Avoid applying chemical treatments immediately before heavy rain events (the product washes away before activating) or during Seattle's winter months when wet roof conditions make access dangerous.
Q: Will my homeowner's insurance cover moss damage?
A: Almost certainly not. Homeowners insurance treats moss as a maintenance issue rather than a sudden accidental event, and policies specifically exclude gradual deterioration from coverage. Your policy covers sudden damage from storms, wind, and falling trees — not the slow process of moss eating through your shingles over years. Worse, if an adjuster documents significant moss as a contributing factor to any roof failure you're trying to claim, they may deny the entire claim on grounds of maintenance neglect. Keep records of annual moss treatments and inspections — these demonstrate due diligence if a claim ever arises for legitimately covered damage.
Q: How long do zinc strips last on a roof?
A: Zinc strips typically last 10 to 15 years on Seattle roofs; copper strips last 20 to 30+ years. The strips work precisely because they slowly dissolve over time — that dissolution process is what releases the protective ions. When strips are significantly thinned or have developed gaps, it's time to replace them. At a professional installation cost of $200 to $400 for zinc and $400 to $800 for copper, the amortized annual cost is $15 to $40 per year — far less than the annual moss treatment costs they largely replace.
Q: Can I prevent moss without using chemical treatments?
A: Yes, through a combination of mechanical and physical methods. The most effective non-chemical prevention approaches are: (1) Install zinc or copper strips — these use natural metal ions, not synthetic chemicals, and are considered the cleanest prevention option; (2) Trim overhanging branches to improve sun exposure and airflow across the roof surface — more sunlight means faster drying and fewer hours of moss-favorable conditions; (3) Remove debris regularly from roof valleys, gutters, and low-slope areas — eliminating the organic growing medium prevents spore establishment; (4) Improve attic ventilation to reduce moisture buildup from below. No single method is as effective as metal strips plus debris management together, but this combination significantly slows growth without any sprays or granules.
Q: What happens if I ignore moss on my Seattle roof for years?
A: The damage builds compounding interest. In the first 1 to 3 years, moss establishes and begins lifting shingles — $300 to $500 in treatment resolves it. By years 3 to 5, shingles are visibly deteriorating and require $1,500 to $3,000 in repair. By years 5 to 8, constant moisture is reaching the decking and creating soft spots that need structural attention — $3,000 to $8,000. By years 8 to 12, deck rot is established in multiple sections — $5,000 to $15,000 in repairs, or more. By year 12 and beyond, what would have been a 25-year roof has been reduced to a 12-year roof by moss damage alone — triggering a $15,000 to $35,000 replacement that should have been 10 to 15 years away. Prevention is not optional for Seattle homeowners.
Q: At what point should I consider replacing rather than just treating my moss-covered roof?
A: When moss has been established long enough to cause lifted shingles, significant granule loss, or visible deck softness, treatment alone may not be enough. Our roof repair vs. replacement guide covers this decision in detail. As a rule, if your roof is 15+ years old, has more than 25% coverage, and shows multiple shingles with broken seals, the cost of treatment plus shingle repair often approaches replacement — making a new roof with built-in algae protection the better investment.
Protect Your Seattle Roof from Moss — Take Action Now
Moss on your Seattle roof is inevitable. Damage from moss is not — if you act before it gains a foothold and treat it consistently once it does.
The most important steps Seattle homeowners can take right now:
- Inspect your roof from the ground — if you see green on north-facing slopes or in valleys, moss is already establishing
- Apply a fall treatment — broadcast zinc sulfate granules or spray Wet & Forget before the October rains arrive
- Budget for zinc strip installation — at $200–$400, it's the single best long-term investment against Seattle's relentless moss pressure
- Schedule a professional assessment if coverage is significant, shingles are lifting, or your roof is 15+ years old
The Seattle Roofing Company serves Seattle, Bellevue, Lynnwood, Tacoma, and all of King, Pierce, and Snohomish counties. We're GAF and IKO certified, backed by a $250,000 workmanship guarantee, and available for same-day assessments on urgent situations.
[Schedule a $249 Roof Inspection](/contact) to get a full written assessment of your roof's moss situation — or [request a free estimate](/contact) for moss removal and zinc strip installation.
Your roof protects everything inside your home. Protecting it from moss is one of the simplest, most cost-effective things you can do as a Seattle homeowner.

 Roofing Tips